This recipe was the result of trying to create a dessert that was allergen free and low inflammatory. This “cheesecake” is dairy free, refined sugar free, and gluten free. It is also insanely delicious and just a little bit is perfectly satisfying and indulgent!
Recipe testing is one of those things that can either go really well or really sideways, depending on the day and the experiment. Haha 🙂 Regardless, I really enjoy playing around with food and trying out new things. Sometimes I test recipes out of necessity for work, to clean out the cupboards, or sometimes for health. This recipe was the result of trying to create a dessert that was allergen free and low inflammatory. This “cheesecake” is dairy free, refined sugar free, soy free, and gluten free. It is also insanely delicious and just a little bit is perfectly satisfying and indulgent! It isn’t a difficult recipe, but has a lot of elements and does require some planning. Make sure you have everything started and the cashews soaking the day before you actually want to eat this delicious dessert! I hope you enjoy it as much as I do. Happy baking!
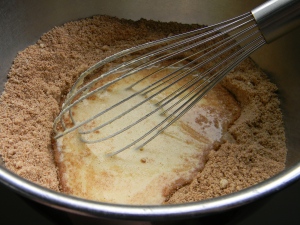
In a bowl, combine the almond flour, coconut flour, salt, flax seed meal, and unsweetened shredded coconut. Stir the ingredients together.
In a small microwave container melt the coconut oil.
Add the melted coconut oil to the bowl with the almond flour mixture. Using a fork stir everything together until just combined and resembling wet sand.
Using your hand, gently press the crust mixture firmly and evenly into the bottom and sides of a pie pan.
Bake the crust for 15 minutes or until golden brown.
Remove from oven and place on a cooling rack to cool complete.
Once the crust is cooled, cover and set aside for use the next day once the filling is ready.
To Make the Meyer Lemon Curd
Begin by measuring out all your ingredients for the curd separately and setting them aside.
Set up a double boiler next. Fill a small pot with water and bring to a gentle boil then reduce the heat slightly. Place a bowl on top of the pot of water. It should be a nice fit and sit well on top of the pot of water trapping the steam in without being too wobbly.
Place the Meyer lemon juice, whole eggs, egg yolks, and honey into the bowl on top of the double boiler.
As the mixture heats, it will begin to thicken and cook the eggs through. Whisk mixture constantly or you will end up with scrambled eggs. It should be done gently with constant stirring until it reaches 135 degrees F. Safety first!
Turn off the pot of water and remove the bowl from the heat.
Add the pinch of salt and coconut oil. Gently whisk the mixture together until the coconut oil is thoroughly incorporated and smooth.
Place the bowl of lemon curd into the refrigerator to cool overnight.
To Make the Filling & Finish the “Cheesecake”
Measure raw cashews into a container. Make sure there is a little bit of extra room for the cashews to expand as they soak. Cover the raw cashews with your favorite almond milk. I like to use Almond Breeze’s Almond Coconut Blend Original Unsweetened. Cover the container and place in the refrigerator. You can also use water if you’d prefer, but I recommend using the opportunity to impart extra flavor whenever possible!
Soak the cashews overnight.
The next day remove cashews from the refrigerator. Pour off the little extra almond milk that didn’t get soaked up.
Combine coconut cream, vanilla, and honey with the soaked cashews. In a blender or food processor (or with an immersion blender) puree the cashews and coconut cream until completely smooth.
Scrape down the sides and continue blending to make sure that the entire mixture is smooth.
Next, pour the “cheesecake” filling into the cooled crust and smooth out evenly.
Set “cheesecake” into refrigerator to chill for 1 hour.
Once the “cheesecake” is slightly firm spread the lemon curd across the top and cover with fresh raspberries.
Return the finished “cheesecake” to the refrigerator to finish setting for at least another hour.
When thoroughly chilled and set, slice the “cheesecake” into pieces and enjoy!!!
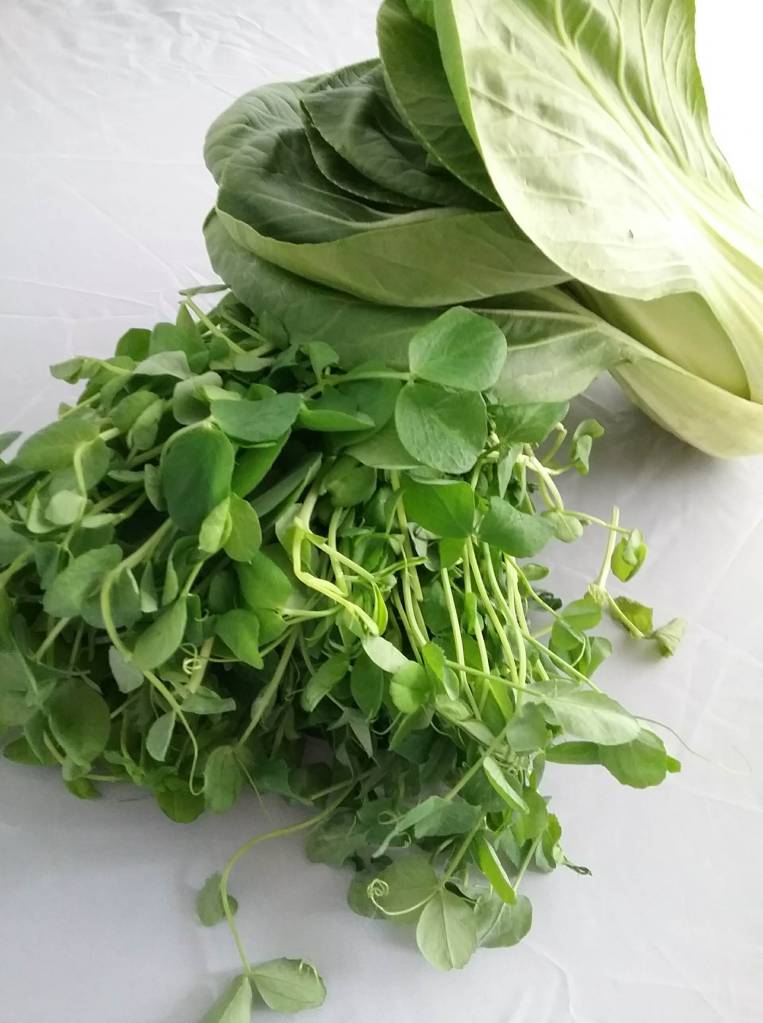
My favorite thing about working with food is that there is always something new to discover; a new technique, fun fact, or new ingredient just waiting to peak the curiosity. On the weekends, I love to wander the local farmers market and see what is in season and if there is something new to work onto my dinner plate. This weekend did not disappoint as I discovered two new ingredients I hadn’t worked with before, pea shoots and pac choi (also seen as pak choy).
The tangled little bundles of pea vines on the table were so inviting and lured me in for a conversation with the farmer. Pea shoots are the young and tender vines of the pea plant available during spring and early summer season. A delicate green traditionally used in Asian cuisine that can be eaten fresh or cooked and could be used as a substitute for similar greens, like spinach. A little bundle was definitely coming home with me. Next I stumbled across what at first I thought was baby bok choy, a bunch of leafy greens with white stalks, but a tiny hand written chalk sign said different, pac choi. Another conversation starter as I tried to figure out what the difference between pac choi and bok choy was, as they looked identical. The differences are small as they are essentially the same plant, both Chinese cabbage, but as the farmer explained pac choi at full size is about the size of a baby bok choy. Intrigued and excited by my farmers market finds I went home with inspiration for my dinner in hand.
Pea Shoots 1 pound, washed & cut into 2 inch pieces
Pac Choi 1 each, washed & cut into 1 inch pieces
Tamari or Soy Sauce 2 tablespoons
Black Pepper to taste
Sesame Seeds for garnish
Directions
Prepare and measure all your ingredients and set aside. Pro Tip: Freeze the fresh ginger first before peeling and grating! I recommend using a microplane zester to get a finely grated ginger.
In a skillet or wok, combine the vegetable and sesame oil. Heat the oil over medium-high heat.
Once the oil is hot, add the julienned onion and cook for 3 to 5 minutes or until the onions start to caramelize and turn golden brown.
Add the minced garlic and grated fresh ginger and cook for about a minute, tossing often.
Next add the pea shoots and pac choi and toss together with the onions, garlic and ginger. Stir-fry for a minute or two just until the pea shoots and pac choi are slightly wilted.
Add the tamari or soy sauce and black pepper to taste. Toss together, sprinkle with sesame seeds and serve immediately.
Stir-fried pea shoots & pac choi go great with steamed jasmine rice or even some chicken satay!
Lovely Washington days, like we’ve been having this week, call for quick and easy recipes and limited time in a kitchen. One of my favorite homemade snack recipes is perfect to make and enjoy on a warm day, plus it is healthy and delicious as well!
I don’t know about you, but when the sun comes out in Seattle I want to be outside enjoying it as much as possible! Lovely Washington days, like we’ve been having this week, call for quick and easy recipes and limited time in a kitchen. One of my favorite homemade snack recipes is perfect to make and enjoy on a warm day, plus it is healthy and delicious as well! The fruit salsa recipe is easily adaptable to accommodate your favorite fruits or whichever fruits are in season and requires minimal prep and no cooking. So take a few minutes to whip up this tasty snack then enjoy a sunny Seattle afternoon outdoors with friends and family!
Pineapple 1 whole (peeled, cored, and diced small)
Shallot, minced 1 each
Red Bell Pepper, minced 1 each (optional- skip if you want to go nightshade free)
Fresh Raspberries 1 cup
Fresh Lemon/Lime Juice 1 tablespoon
Honey to taste
Directions
Once all the fruits and vegetables have been washed and diced, combine pineapple, shallot, peppers and raspberries together in a bowl and stir well.
Add lemon or lime juice and stir. Add sweeteners as desired—the more ripe and sweet the fruit is, the less honey you will need to add. Sometimes no additional sweetener is needed!!!
Let the fruit salsa sit for a bit for flavors to mingle.
In a small bowl combine sugar and cinnamon, mix thoroughly and set aside.
Using a pastry brush, lightly oil one side of all the tortillas- just enough for the cinnamon & sugar mixture to stick (you don’t have to use all of the oil).
Once lightly oiled, sprinkled cinnamon & sugar mixture over to lightly coat the flour tortillas (you don’t have to use all of the sugar mixture either).
Once sugared cut the flour tortillas into triangles (about 12 per tortilla) and lay out in a single layer on a baking sheet. You may need to bake them in multiple batches depending on the size of your baking sheet.
Bake 5 to 10 minutes or until golden brown and crisp. Let cool completely and enjoy with fruit salsa.
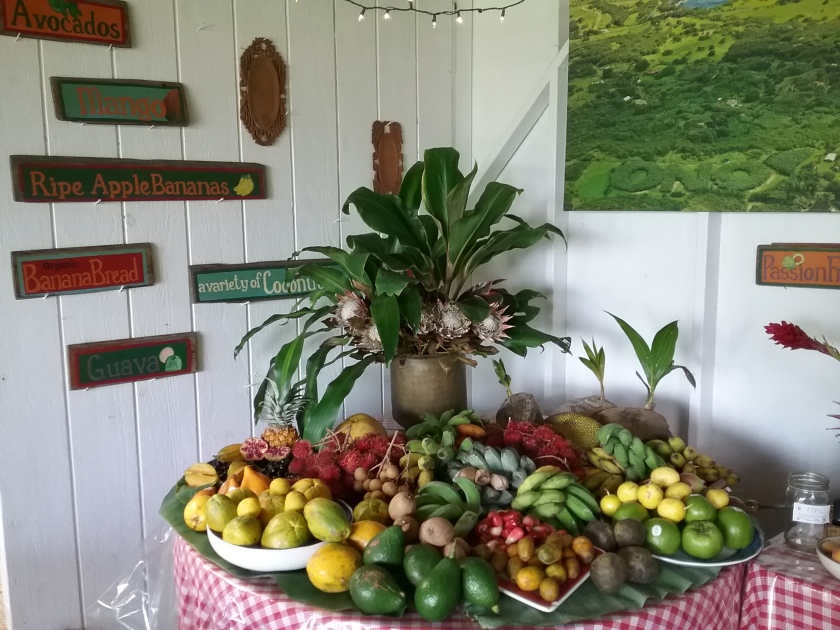
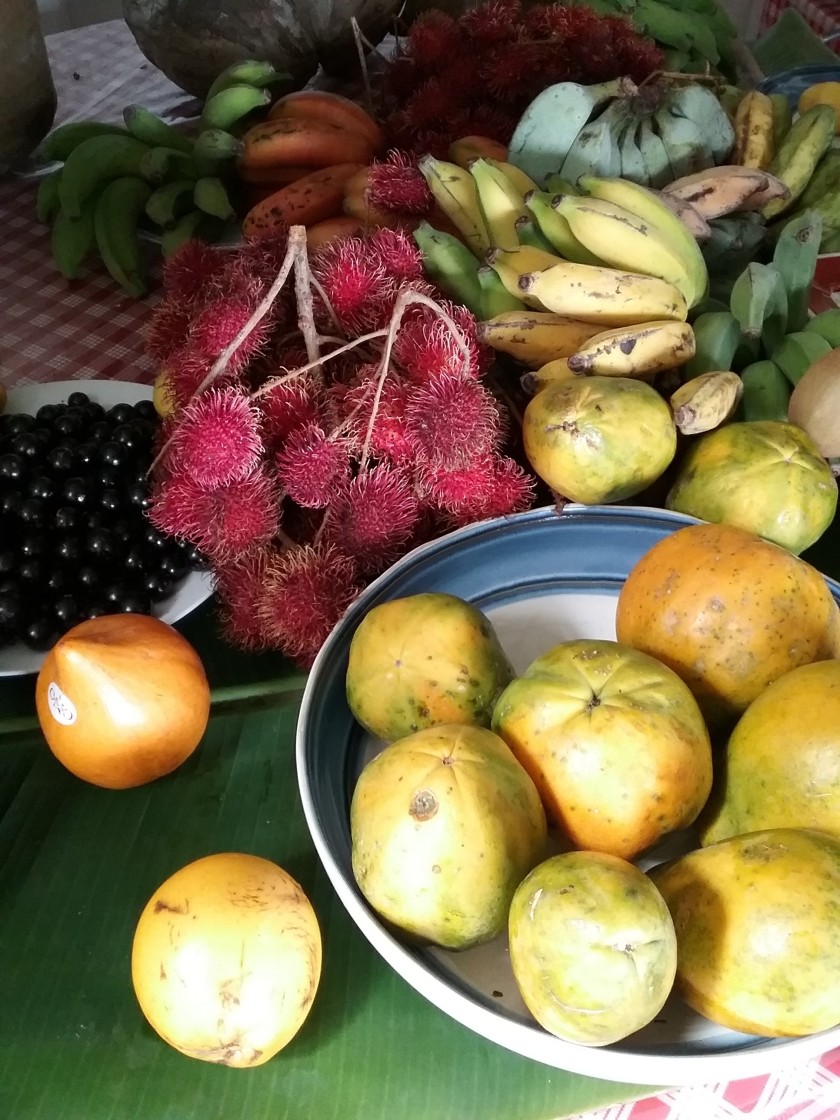
After many hours, the afternoon sun and designated mailbox eventually indicated I had reached my turn off. Up a steep and windy dirt road, the tiny rental car chugged and bucked through 50 acres of pure organic paradise along the southeastern slopes of Haleakala volcano; my excitement continued to build as the driveway kept winding ever upwards. As the dirt road came to an end I was greeted with a covered seating area and an impressive display of exotic tropical fruit with people milling about eagerly. The Road to Hana had led me to my final destination- the Ono Organic Farm.
A lost piece of luggage and the consequent voucher placed me in the middle of a solo adventure in a Hawaiian paradise last month. A full week to myself on the island of Maui to explore and do whatever I pleased. It would be my first visit to Hawaii, and seeing that I had only my own desires to consider my plans naturally were food focused. I find that travel and immersing myself in the food and culture of a new place is the purest form of continuing education as a chef.
As I “googled” and planned from my AirBNB, I contemplated whether I should spend an entire day passing around the 600 plus turns and estimated 54 one lane bridges on the famous Road to Hana. The journey itself replete with dynamic vistas, rainbow eucalyptus trees, and one waterfall and pull off after another had just about sealed the deal, and then I found what I didn’t realize I was looking for… a website for Ono Organic Farm and their tropical fruit tasting adventure! The more I read, the more I was certain this was one adventure well worth a drive for this chef and the perfect capstone to my journey along the Road to Hana. A couple clicks later and I had bought my ticket. I could hardly wait!
The day finally came and I was up before the sun programming an address into the GPS and setting up a Road to Hana app on my phone. I set off on the road from Lahaina and headed towards Paia and with the tasting ticket in hand, start time, a rough estimate of mile marker, and a picture of what the mailbox looked like to indicate which driveway I needed to take up to the farm – I was on my way. I drove along the curvy, picturesque road mile after mile through sun bursts and rain showers pulling over at many of the road side treats along the way. I climbed in lava tubes, played on black sand beaches, ate Aunty Sandy’s fresh banana bread in Kanae, sampled Coconut Glen’s vegan lilikoi (passionfruit) ice cream and continued ever onwards toward the farm. It was sheer bliss and yet it was just the beginning.
After many hours, the afternoon sun and designated mailbox eventually indicated I had reached my turn off. Up a steep and windy dirt road, the tiny rental car chugged and bucked through 50 acres of pure organic paradise along the southeastern slopes of Haleakala volcano; my excitement continued to build as the driveway kept winding ever upwards. As the dirt road came to an end I was greeted with a covered seating area and an impressive display of exotic tropical fruit with people milling about eagerly. The Road to Hana had led me to my final destination- the Ono Organic Farm.
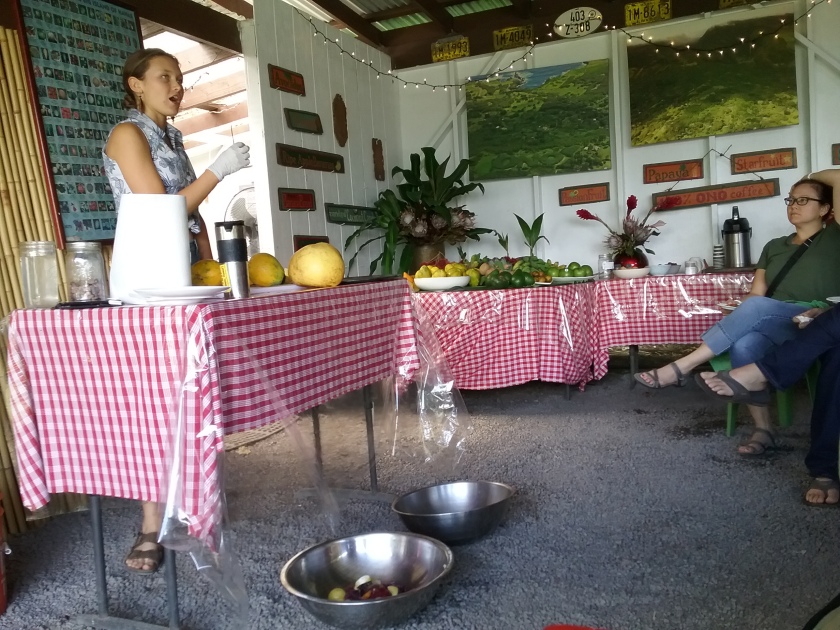
Here I would spend the afternoon with a small group of people for an exotic tropical fruit tasting adventure including samples of at least a dozen in-season tropical fruits, home grown coffee, and home grown and roasted cacao beans. As we waited for the rest of the people to find their way, I savored a mug full of delicious, fresh, hyper-local coffee and gazed in wonder at the table laden with brightly colored tropical fruits in the middle of the covered area.
It wasn’t long before we began our tasting adventure and much to my delight began to work through every single one of the items on the display table. I learned so many wonderful things and tried over a dozen fruits the likes of which I have never seen, even with my many years of working in the food service industry or that could be referenced in my trusty “Food Lover’s Companion” book. Surrounded by the lush jungle where four generations of the Boerner family have been organic farmers, I sat eagerly, notebook in hand and jotted as many interesting tidbits between samples as I could. In the Hawaiian language, “ono” means most delicious and each sample of hand-picked premium fruit I tried further proved Ono Organic Farm was aptly named. The day ended with a tour around the farm and even more opportunities to try items straight from the source! When it finally came time to get back in my little compact rental to begin the long journey home, I left with a full belly, a full heart, and a notebook full of culinary inspiration.
If you ever find yourself on the Road to Hana and favor the food-focused itineraries like myself, I highly recommend a visit to Ono Organic Farm! While I couldn’t possibly begin to list all the amazing information shared that day on the farm, I have jotted down some of my favorites! Here are just some of the many fun fruit facts I learned during my tropical fruit adventure in Hana!
Rambutan
Star Fruit
Lillikoi (Passionfruit)
Jabuticaba
A purple, thick-skinned berry with an astringent skin, but sweet gelatinous flesh, similar to a grape. This berry ferments fast, so is a very rare find outside of areas that grow it. Often used in jams, jellies, and tarts.
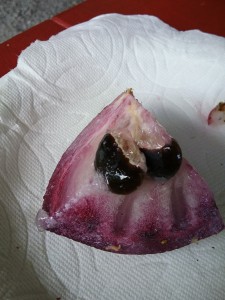
Longan
LonganInside of the Longan
This small round fruit has a thin, brown shell surrounding a translucent white, juicy fruit around a center black seed. It is sweet and perfumy in flavor and is related to the soapberry family, of which lychee and rambutan are also a part.
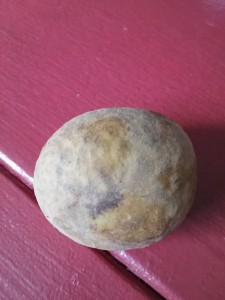
Mountain Apples
A small bell shaped fruit with waxy red/pink skin, that grows wild and has a soft, slightly crunchy texture and distinct rose taste. Not actually a relative of the traditional apple tree though. They said a tree only produces fruit just two weeks of the year!
Jackfruit
The world’s largest fruit from the same family as breadfruit which has pebbly skin and can grow up to 100 pounds! It houses gold fleshy pods when ripe and has a sweet flavor like that of Juicy Fruit bubblegum.
Star Apple
Star Apple
A purplish fruit roughly the size of an apple named for the starburst shape of the core. There is a thin layer of natural latex in the skin, so do not bite into it – instead slice it up. This latex keeps insects from stinging and burrowing into the fruit. Avoid the rock hard, black seeds as well! Another rare find as it bruises and ferments easily!
Atemoya
Atemoya
This fruit is in the custard apple family, related to the cherimoya and soursop. Roughly the size of a bell pepper with a green, petal textured skin. It is soft, sweet, tangy and creamy like a sorbet- almost like a blend of mango and vanilla. The flesh is studded with large black seeds which you should not eat.
Egg Fruit
This fruit is creamy & rich like an egg yolk and great for soups, raw pies, and curries. Tear drop shaped, golden yellow with a big seed in the middle (toss this); also, known as canistell. It had the texture of cooked pumpkin, but with a tangy taste.
Durian
Durian fruit is harvested fresh on their farm in October, but most of the durian is shipped to the mainland. Durian fruit has a semi-hard, spiky shell and has an incredibly nauseating smell, indeed is often outlawed in certain venues, such as public transit and airlines. Each fruit can have one to six pods of custardy like flesh around one center seed. A durian blossom has six parts and each part must be pollinated to bear fruit!
Chico Sapote
Chico Sapote
This little brown fruit has a texture similar to a pear, but tastes like brown sugar! The skin is edible, but a little fuzzy.
Pineapple
Maui Gold Pineapple grown over island is very sweet and has low acid. Ready to eat when the top twists off easily! White pineapple is another varietal, that is even more sweet and not fibrous, but is hard to grow.
Papaya
When planting papaya, they put three plants per hole as there are male, female, and hermaphroditic plants. The hermaphroditic plants are the ones that bear the traditional “papaya” shape, while the female plants bear a round fruit and males do not produce. The papaya of the female fruit trees tend to have fewer seeds. There is a large center cavity filled with grayish-black seeds which are edible, but extremely peppery! I have never been a big fan of papaya, but it was recommended to pair a slice of fruit with a squeeze of fresh Tahiti lime juice and it was absolutely delicious! It completely changed the flavor to me.
Papaya & Tahiti Lime
Tahiti Lime
A sweet, pale yellow lime that is actually a cross between a key lime and a lemon. Accents fresh papaya incredibly well!
Bilimbi
This tree was incredibly bizarre looking like it had an infestation of small pickles growing all over it! We were welcomed to pick one and try it…it was very much like a pickle in texture, but was terribly sour, like atomic war head. I thought my face was going to turn inside out! Used for items like chutneys, relishes, preserves or to add a sour flavor to curries or soups.
Bilimbi Tree
Bilimbi
Bananas
There were a variety of bananas grown on the farm. Cuban red bananas are a starchier banana and often used for cooking, while the apple bananas are small and sweet and the most commonly eaten banana in the islands. The ice cream banana was another that has a “fluffier” texture. It takes 18 months for a tree to produce stalk of bananas. At harvest plant throws off shoot “babies,” so the whole tree is cut down with the stalk of bananas to force nourishment to the baby trees.
Red Cuban Banana
Bananas!
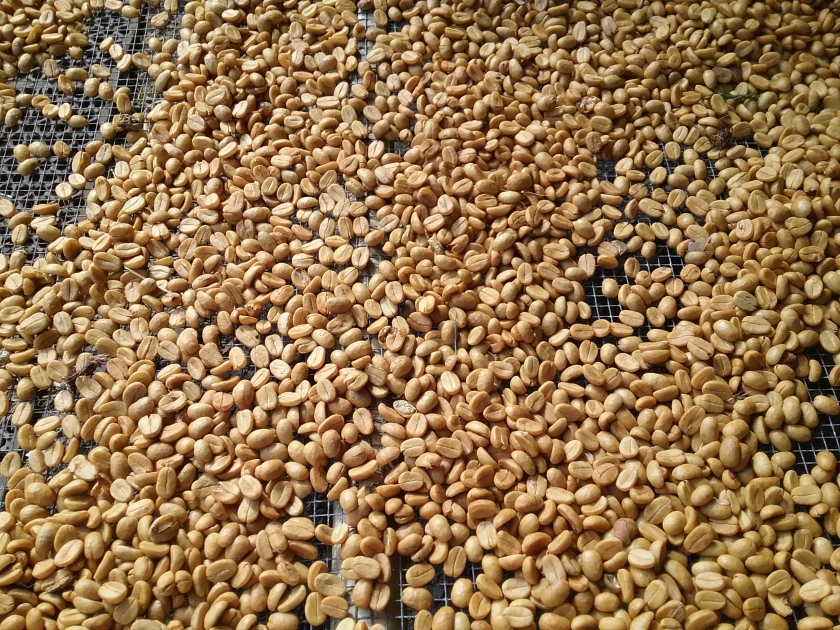
Coffee
Unfortunately, a beetle infestation has made it to the islands that bores into coffee trees killing it in just a couple of weeks. Most places on the island had stopped production (or at least tours) to get rid of beetle. It apparently had hit the Big Island hard as well, so if you have been wondering why the Kona coffee prices are so high right now…that is why!
Sprouting CoconutCoconut Husking DemoThe coconut water on a sprouted coconut turns to a foam as nourishment for the sprout! It tasted like coconut flavored styrofoam packing peanuts!
While the days of gorging on Easter candy before breakfast may be behind me now (mostly… 😉 ), there are still some family traditions that remain each year. These days I can live without the chocolate bunnies and even the ham, but I can never skip my family’s Easter breakfast dish, Creamed Eggs on Toast. It was never a fancy Easter brunch we had, but it is always something I looked forward to each Easter.
A holiday for me always draws upon the nostalgic bank of memories of shared meals and comfort food. Easter is right around the corner and I find myself thinking of dyed eggs, chocolate bunnies, and ham. All those mornings of rummaging through baskets and ruining my breakfast with candy coated chocolate eggs and malted milk balls covered with bright pastels looking like the eggs of a robin. While the days of gorging on Easter candy before breakfast may be behind me now (mostly… 😉 ), there are still some family traditions that remain each year.
These days I can live without the chocolate bunnies and even the ham, but I can never skip my family’s Easter breakfast dish, Creamed Eggs on Toast. It was never a fancy Easter brunch we had, but it is always something I looked forward to each Easter. Every year as the holiday would approach, I would get excited and talk about how I couldn’t wait to eat it and every year I have been met with confused looks by my friends and acquaintances- even still today. It seems Creamed Eggs on Toast is not a commonly known or eaten dish, at least in my experience of talking it up. It has always surprised me so few have encountered this breakfast, when so many similar variations exist out there. I do not know of its origins, beyond that of grandparents on both sides making it for my parents as they were growing up and that it was something we ate at Easter, but it is something that stuck with me. This recipe is simple and delicious, and as my mom likes to add, “a great way to use up all those dyed eggs.” Perhaps using up all those dyed eggs is its origins after all…
Creamed Eggs on Toast!
More often than not, these foods that stick are the ones made simply with love and are shared with family and friends. While I may have taken the liberty to use some slightly different ingredients than that of my childhood version (a local bread for instance), the heart and soul remains. These are the types of food I love to share. So, extra dyed Easter eggs or not, I encourage you all to try out Creamed Eggs on Toast this Easter weekend. May you find it as comforting and delicious as I always do.
White Bread, sliced 4 slices (or more, if your appetites are hearty!)
Butter as needed, to butter toast
Directions
Gather all your ingredients and measure them out.
In a small sauce pan, place whole eggs in shell. Add cold water until your eggs are completely covered.
Over high heat bring the eggs to a full rolling boil. As soon as the eggs come to a full rolling boil turn off the heat completely and put a lid on the saucepan.
Set a timer for 13 to 15 minutes.
When the timer is up, your eggs should be perfectly hard boiled! Using a strainer get eggs out of the hot water immediately. Place back in the saucepan and cover with cold water again, to stop the cooking process and to cool them enough to handle. You may need to repeat this process twice to cool them thoroughly.
Once the eggs are cool enough to handle, peel off the shells and rinse the eggs well under cool water, as pieces of egg shell are not very tasty.
Using a small cutting board and paring knife, dice the peeled eggs into small pieces. I like to separate the yolk and the white pieces from each other (but it isn’t necessary….my mom always just kept it all together). Set diced egg aside.
Now to begin the cream sauce! In the small saucepan, add the butter and melt over medium heat.
Once the butter has melted add the flour and whisk out any lumps. It should look like a thick paste or wet sand. This is the roux (pronounced “roo”) that will thicken the sauce. Reduce heat a little and cook for 3 to 5 minutes to get rid of raw flour taste, but develop a slightly nutty flavor. This is a basic white roux and can be used in many recipes. Be careful not to burn it.
Whisk the milk into the roux in the saucepan. Allow to simmer, whisking constantly. As the sauce heats up, it will begin to thicken. Do this over a fairly low heat as to not scorch the milk and for a silky-smooth sauce at the end.
While the sauce is simmering and thickening is the perfect time to start making your buttered toast.
Once the cream sauce has thickened, it is time to add the diced eggs. If you kept the yolks separate, whisk them in first to produce a slightly yellow, velvety sauce then add in the diced whites. If you kept the egg bits all together, just add them all in at once. 🙂
Add salt and black pepper to taste, as you’d like.
Divide the creamed eggs over pieces of buttered toast you made while the sauce was thickening. Enjoy while hot. Happy Easter!
For these cold evenings, I find a mug of mulled wine to be the perfect warm beverage to take the chill off.
Spring has definitely sprung in Seattle. The cherry blossoms are in full bloom, the days are getting longer, but a crisp chill remains firmly in the air. Chilly nights beg for a little warm up and a snuggly blanket. For these cold evenings, I find a mug of mulled wine to be the perfect warm beverage to take the chill off. This is another easy recipe requiring very few ingredients and very little effort before offering up huge rewards! A great beverage recipe to have up your sleeve any time of the year.
In a medium saucepan, pour in the entire contents of the bottle of wine.
Add sugar, cinnamon sticks, whole cloves, and sliced mandarins to the wine in the saucepan. Feel free to adjust the sugar, up or down, to your own taste.
Simmer wine over low heat for 30 minutes to develop flavor.
Strain out the cinnamon sticks, cloves and mandarin slices.
Pour the mulled wine into mugs and enjoy while hot!
Ginger Molasses cookies are perfect! These cookies are quick, they taste of the season (and will make your house smell fantastic too), and requires very little effort or ingredients to make. Did I mention they also happen to be vegan?
I woke up this morning well before my alarm was due to go off and with a running list of things I needed to get done before Thanksgiving tomorrow, both for at work and at home. However, more than anything I had the urge to bake something. I wanted to bake something for my kitchen crew who come in each day with a smile on their face, work hard (particularly during these busy holiday weeks) and do it with all their heart. They are truly a great and passionate team and for that I am thankful. Seeing as Thanksgiving is all about showing gratitude, this morning it was important to me let the “to do” lists wait and get something working for my crew. My favorite way to show my appreciation is with a lovingly baked food. Seeing that I have made 140 pies in the past week I wanted a change of pace…I am all pied out. Ginger Molasses cookies are perfect! These cookies are quick, they taste of the season (and will make your house smell fantastic too), and requires very little effort or ingredients to make. Did I mention they also happen to be vegan?
I hope you all find you are surrounded by love, laughter, and a metric ton of delicious eats this holiday! 🙂 Happy baking and Happy Thanksgiving to you all!
Preheat oven to 350 degrees F. Set out two cookie sheets with parchment paper.
In a bowl, combine the flour, baking soda, salt, ginger, cinnamon, cardamom, and brown sugar. Mix well.
To the dry ingredients add the oil, molasses, and water. **I recommend measuring the oil first in the measuring cup and then the molasses in same measuring cup after, so that it slides right out!**
Mix all the ingredients together until it forms a firm, but slightly sticky dough.
Wet your hands lightly and shape the dough into 24 balls.
Place granulated sugar in a small bowl or plate. Roll each ball in sugar.
Place cookie dough balls on the cookie sheets about 2 inches apart from each other.
Bake 10 to 15 minutes. Remove from oven and let stand on the pan for a few minutes before moving them to a cooling rack. The cookies will be soft when warm, but firm up as they cool.
Enjoy or store in an airtight container to keep soft and delicious. They go well with some eggnog!
These morsels are dense and absolutely jam packed with protein and fiber, while also being gluten-free, dairy free, and contain no refined sugars (but with a hint of sweetness just the same—thank you dates!). They have become my go-to “grab and go” breakfast.
As the days grow shorter, the weather increasingly brisk, and the calendar fills with holiday obligations, I find my time very limited and my energy levels waning. While I never claim to be a morning person, it seems much worse during the autumn and winter. It is only after many presses of the snooze button am I able to drag myself out of bed to face the never-ending “to do” lists that await me. My productivity levels on these days are highly dependent on my choice of breakfast fuel and ample amounts of caffeine. I have found if I am not careful I easily slip into the habit of just grabbing whatever is convenient at the local coffee shop or worse, skipping breakfast entirely; a habit which is completely detrimental to my energy level. However, with just a bit of prep on the weekend I discovered I can set myself up for a week of very sleepy, delayed trips out the door with breakfast in hand. This recipe I developed while on a round of an elimination diet. I was not happy with the recipes given to me and so I decided to make up my own within the restrictions set. I call them Blueberry Breakfast Bombs. They are not like a traditional muffin that are light and fluffy and oh so sweet, completely lacking in protein and fiber; these morsels are dense and absolutely jam packed with protein and fiber, while also being gluten-free, dairy free, and contain no refined sugars (but with a hint of sweetness just the same—thank you dates!). They have become my go-to “grab and go” breakfast. Just one does the trick! If I have a few minutes to spare, I may grab some Greek yogurt or an apple to enjoy with it too!
Preheat oven to 350 degrees F. Line a muffin pan with 12 paper muffin cups. Lightly spray with non-stick cooking spray. Set aside.
In a bowl, combine almond flour, coconut flour, salt, baking soda, and cinnamon. Whisk together. Make a well in the middle of the dry ingredients. Set aside.
In a separate small bowl, whisk together eggs, vanilla, melted & cooled coconut oil, and coconut milk until thoroughly combined.
Pour egg mixture into the well in center of flour mixture. Stir until thoroughly incorporated.
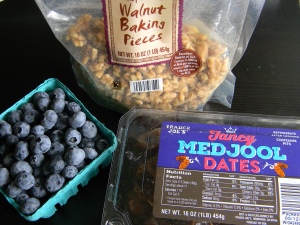
Add the chopped dates, blueberries, and chopped walnuts to the batter. Fold in gently into batter. Note: The batter will be very thick.
Once the batter is completely mixed scoop into the prepared muffin pan and liners. Divide the batter evenly between the 12 and smooth flat. The batter will not spread or rise much during baking.
Bake for 20 to 25 minutes or until an inserted knife comes out clean.
Cool and enjoy! Muffins keep for about a week if stored in an airtight container and refrigerated. They also hold up well in the freezer.


")